Autumn is probably my favorite season. Give me all the cozy sweaters, boots, crisp mornings, pumpkin everything, and, of course, a steaming mug of tea, coffee, hot cocoa, or soup--whichever fits my fancy at the time. However, I live in Texas, where autumn doesn't truly show up until sometime in late October/early November. It's September 18th, meaning we have a little time until autumn shows up in her full glory, but seeing as I'm chomping at the bit for it to finally come, I decided to make an autumn-themed mug cozy in...wait for it...TWO SIZES!!!
I made a tester cozy for my sister, and she texted me the other day with a photo of her mug and said, "I was like, 'wow, my mug is super hot' and was barely holding onto it, and then I remembered I have a solution now!" So these cozies serve three purposes! 1) to look super cute and cozy for the cooler weather; 2) to keep your drink warm a little longer, and 3) to protect your hands when you want to drink a scalding hot mug of tea/coffee/hot cocoa/insert your favorite drink here. :)
Note: This is a beginner-friendly pattern that uses the chain stitch (abbreviated as ch), the single crochet stitch (abbreviated as sc), and the double crochet stitch. If you're unfamiliar with the double crochet stitch, Fiber Flux has a great tutorial on YouTube that explains how to do it! (She also has a beautiful Instagram page that you should check out if this blog interests you at all.)
As always, there will be an abbreviation key at the bottom of the page to help you, and if you want a tutorial about making the foundation chain, single crochet, and fastening off, check out my other pattern for the Coffee Cup Cozy.
Materials:
- Size 4 yarn in the color of your choice (I used the Ice Cream Cotton Blend by Lion Brand in the color Chocolate, because it gave off strong autumn vibes)
- Size H/5.00 MM hook
- A 0.75 inch (19 MM) button in the color of your choice
- A yarn needle for weaving in the ends
- A regular sewing needle and thread for sewing on the button
Small Mug Cozy:
10 in (25.4 cm) mug circumference

Foundation Chain: ch 36
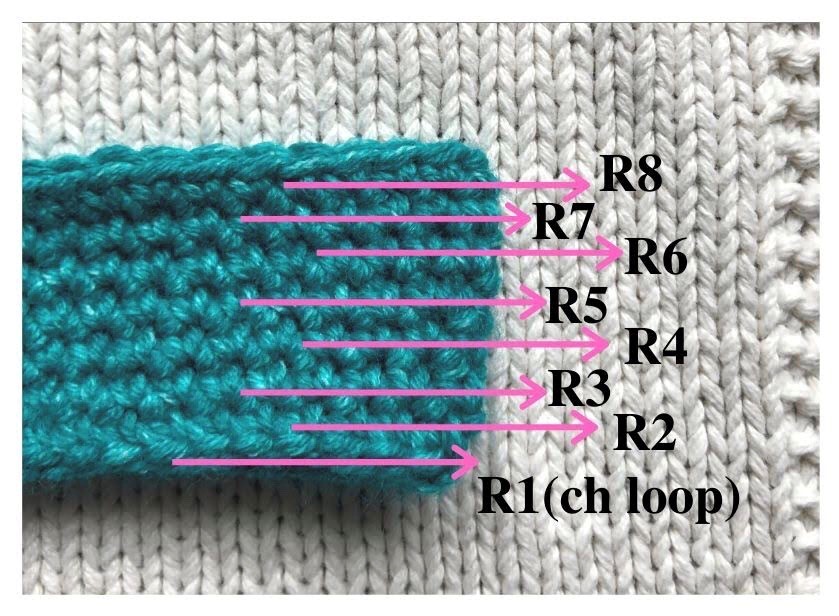
R1: in the third chain from the hook, dc 1, then sc 1, dc 1, and repeat to the end of the row, then ch 2. You'll have 34 stitches.
R2-8: dc 1, sc 1, repeat to the end, ch 2
Don't fasten off when you get to the end!
Along the short edge, sc 4, ch 11 (this creates the loop), sc 4, ch 1. Turn. Then sc 18 (single crocheting in the chain loops rather than around the chain).

Fasten off and weave in your ends. Then scroll down to the step labeled Sewing on the Button below!
Large Mug Cozy:
11.5 - 12.25 in (29.21 - 31.12 cm) mug circumference

Foundation Chain: ch 44
R1: in the third chain from the hook, dc 1, then sc 1, dc 1, and repeat to the end of the row, then ch 2. You'll have 42 stitches.
R2-9: dc 1, sc 1, repeat to the end, ch 2
Don't fasten off when you get to the end!
Along the short edge, sc 5, ch 11 (this creates the loop), sc 5, ch 1. Turn, then sc 20 (single crocheting in the chain loops rather than around the chain). Fasten off and weave in your ends. Then scroll down to the step labeled Sewing on the Button below!
Sewing on the Button:
On the opposite end of the cozy from the loop, place your button so the side of the button is about an eighth of an inch from the edge of the cozy, as pictured below:


Abbreviation Key:
ch = chain
sc = single crochet
dc = double crochet
R = row
If you enjoyed this pattern or have any critiques, let me know in the comments below, and if you make a mug cozy, tag me on Instagram @yarnsandtalescrochet! I can't wait to see your creations!
Have a great weekend, and I'll see you in two weeks with another crochet pattern!
~Abbie