1.1: Make a slipknot, insert hook into the loop and pull the loop taut around
the hook.
1.2: Hold the yarn between your first and middle fingers and pinch the yarn
close to the hook with your thumb and ring finger.
I’ve found that this finger placement gives me more control over the yarn and makes the stitches tighter together than a more traditional way to hold the yarn.
You want to keep some tension in the yarn you’re holding between your fingers, but be careful. Too much tension will make your stitches too tight while too little tension will make them too loose. I encourage you to experiment with your tension to find what feels the most comfortable and natural for you!
Step 2: Chaining
2.1: This pattern begins with a chain stitch (abbreviated as ch). To
make a chain stitch, wrap the hook around the yarn (2A) (called yarning
over) and pull the hook and yarn through the first loop (2B).
2.2: Repeat the chain stitch until you have 32 ch stitches, which form a V
shape. Count the stitches like so:
Step 3: Slip Stitch to Join the Circle
3.1: Slip
stitch (abbreviated as sl) to join the ends of the chain link to form
a loop.
To slip stitch join, push the hook through the top of the very first
loop of the chain (where the pink arrow is pointing in the photo to the right
and indicated in 3a), wrap the hook around the yarn (3b), and
pull the yarn loop through (3c & 3d).
3.2: ch
1 to close off the first row (abbreviated as R) and begin the second.
You have now finished the base of the cozy!For the following rows, you will use a single crochet stitch
(abbreviated as sc) and increase (abbreviated as inc) when
instructed to steadily widen the top of the cozy.
I’ve found it easiest to
single crochet if you hold the chain loop between your thumb and ring finger,
but I would encourage you to play around with how you hold it and choose what
feels the most natural to you.
Step 4: Learning the Single Crochet Stitch
4.1: To make the single crochet stitch, you will push the hook through the topmost
loop of the chain loop (called the front loop) (4a), yarn over (4b),
and pull the yarn through the chain loop (4c), but not through the
loop that is already on your hook.
You will now have two
loops on your hook (4d). Yarn over again (4e), and now you will pull
through both loops on the hook (4f). This forms a single crochet
stitch!
Note: When you sc over another
sc row, you will push the hook through the top two loops (the V shape)
of the sc stitch.
Feel free to practice the sc stitch as many times as you need, and I
encourage you to play around with the tension in the yarn you’re holding to
determine how tightly or loosely you want your sc stitches to be.
4.2: sc
32 times until you reach the end of the row.
When viewed from above, the sc stitch resembles a V shape, and to count the stitches, you will count each V shape as seen in the photo below:
4.3: Then
you will sl join to connect the end of R2 to the beginning of R2, and ch 1 to begin
R3. When you sl in a sc row, slip the hook through both top loops of the
sc stitch.
Step 5: Increasing in Single Crochet
To increase (inc) a sc stitch, you will sc twice in the same
stitch.
Step 6: Counting Rows
If you’re anything like
me and tend to get easily sidetracked, it’s helpful to know how to count rows
so you don’t lose your place and have to start over. For larger crochet
projects, it might be beneficial to purchase a stitch marker (most craft stores carry them), but for something
this small, you can manually count each row.
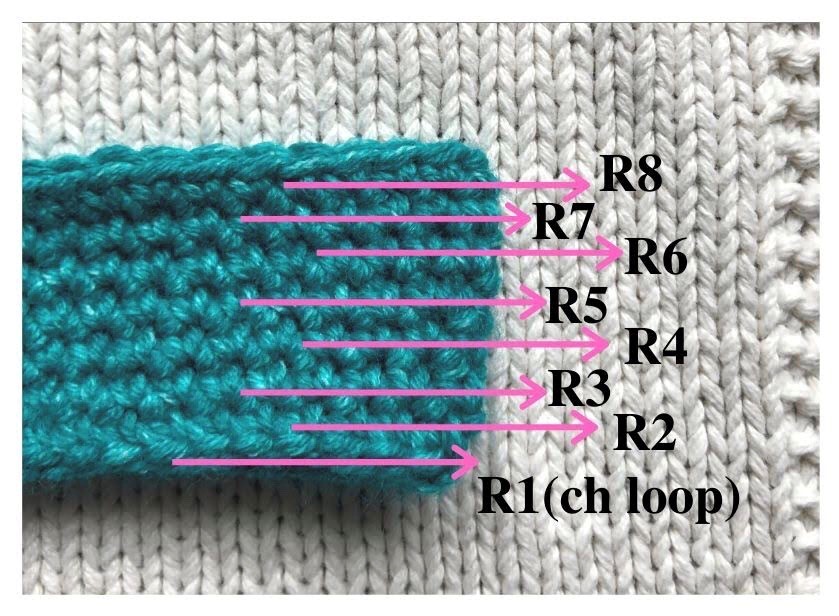
6.1: Lay your project flat. You’ll notice ridges along the sides, which are your
single crochet stitches that form the rows as pointed out in the photo to the
right.
Step 7: Continuing the Pattern
Now that you know the
basics, the rest of the pattern goes like so:
R3-4: sc 32, sl join to
close the row, ch1.
R5: sc 15, inc 2 sc in the same stitch, sc 15, inc 2 sc in the last
stitch, sl join to close the row, ch 1. (You should have 34 stitches.)
R6-8: sc 34, sl join to
close the row, ch 1.
R9: inc 2 sc in the first
stitch, sc 16, inc 2 sc in the same stitch, sc 16, sl join to close the row, ch
1. (You should have 36 stitches.)
R10-11: sc 36, sl join to
close the row, ch 1.
R12: sc 9, inc 2 sc in
the same stitch, sc 17, inc 2 sc in the same stitch, sc 8, sl join to close the
row, ch 1. (You should have 38 stitches.)
R13-14: sc 38, ch 1
Step 8: Fastening Off
When you finish the final row, sl join as usual, and ch 1. Then cut the yarn,
leaving enough of a tail so that your cozy doesn’t become unraveled, and pull
the tail through the final ch stitch. This is called fastening off.
Step 9: Weaving in the Tail
With your yarn needle, weave
in the tail by pulling it down through a few rows to hide the tail, and then
trim off the excess length.
Congratulations! You now
have a cute and reusable coffee cup cozy!
I don’t include this in the photo of the finished cozy, but I wanted to
add that you can further personalize your coffee cup cozy by adding buttons,
iron-on appliques, or, if you’re more advanced in crochet, alternating between
colors to make a striped or color block cozy are fun options as well!


No comments:
Post a Comment