Friday, October 9, 2020

Sweater Pumpkin Poufs - a FREE crochet pattern for beginners


Autumn is probably my favorite season. And heaven knows I love everything pumpkin--pumpkin pie, pumpkin muffins, pumpkin spice lattes (for that last one, my husband teases me all the time), and especially pumpkin home décor!

So, like I do with most things I like, I decided to design my own pattern for some crocheted pumpkins, and I was originally planning to only make them in three sizes, but then my friend and I were strolling through the aisles in Hobby Lobby, and I found this wonderful chunky yarn and knew I had to make a fourth, giant pumpkin!

I'll list the materials and the yarn I used down below, along with a sign-up link for my newsletter. Don't worry--I won't bombard you with frequent emails. You'll receive emails periodically with information about the new website I'm working on setting up, pattern releases so you can be the first in line to purchase new patterns (from an online store that is coming soon), early bird discounts for those patterns, and other Yarns & Tales crochet pattern information! Once you sign up, the pattern will appear in your inbox for you to download for free. And if you would be so kind, if you make one of these Pumpkin Poufs, tag me on social media! It really helps me out a lot. :)

Want the FREE pattern for the Sweater Pumpkin Poufs?

Sign up here!


Materials:


Thank you for subscribing and for supporting my journey as I build this business! Have a wonderful weekend, and happy crocheting!

~Abbie

Friday, September 18, 2020

Autumn Mug Cozy in Two Sizes (FREE Crochet Pattern)


Autumn is probably my favorite season. Give me all the cozy sweaters, boots, crisp mornings, pumpkin everything, and, of course, a steaming mug of tea, coffee, hot cocoa, or soup--whichever fits my fancy at the time. However, I live in Texas, where autumn doesn't truly show up until sometime in late October/early November. It's September 18th, meaning we have a little time until autumn shows up in her full glory, but seeing as I'm chomping at the bit for it to finally come, I decided to make an autumn-themed mug cozy in...wait for it...TWO SIZES!!!

I made a tester cozy for my sister, and she texted me the other day with a photo of her mug and said, "I was like, 'wow, my mug is super hot' and was barely holding onto it, and then I remembered I have a solution now!"  So these cozies serve three purposes! 1) to look super cute and cozy for the cooler weather; 2) to keep your drink warm a little longer, and 3) to protect your hands when you want to drink a scalding hot mug of tea/coffee/hot cocoa/insert your favorite drink here. :)

Note: This is a beginner-friendly pattern that uses the chain stitch (abbreviated as ch), the single crochet stitch (abbreviated as sc), and the double crochet stitch. If you're unfamiliar with the double crochet stitch, Fiber Flux has a great tutorial on YouTube that explains how to do it! (She also has a beautiful Instagram page that you should check out if this blog interests you at all.)

As always, there will be an abbreviation key at the bottom of the page to help you, and if you want a tutorial about making the foundation chain, single crochet, and fastening off, check out my other pattern for the Coffee Cup Cozy. 


Materials:

  • Size 4 yarn in the color of your choice (I used the Ice Cream Cotton Blend by Lion Brand in the color Chocolate, because it gave off strong autumn vibes)
  • Size H/5.00 MM hook
  • A 0.75 inch (19 MM) button in the color of your choice
  • A yarn needle for weaving in the ends
  • A regular sewing needle and thread for sewing on the button

Small Mug Cozy: 

10 in (25.4 cm) mug circumference


Foundation Chain: ch 36
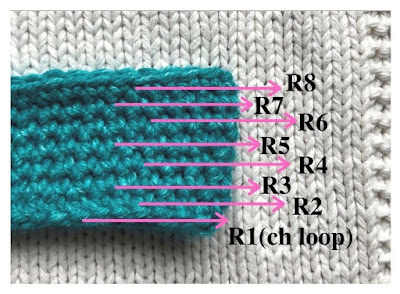
R1: in the third chain from the hook, dc 1, then sc 1, dc 1, and repeat to the end of the row, then ch 2. You'll have 34 stitches. 
R2-8: dc 1, sc 1, repeat to the end, ch 2

Don't fasten off when you get to the end!

Along the short edge, sc 4, ch 11 (this creates the loop), sc 4, ch 1. Turn. Then sc 18 (single crocheting in the chain loops rather than around the chain).


Fasten off and weave in your ends. Then scroll down to the step labeled Sewing on the Button below! 


Large Mug Cozy: 

11.5 - 12.25 in (29.21 - 31.12 cm) mug circumference


Foundation Chain: ch 44
R1: in the third chain from the hook, dc 1, then sc 1, dc 1, and repeat to the end of the row, then ch 2. You'll have 42 stitches. 
R2-9: dc 1, sc 1, repeat to the end, ch 2

Don't fasten off when you get to the end!

Along the short edge, sc 5, ch 11 (this creates the loop), sc 5, ch 1. Turn, then sc 20 (single crocheting in the chain loops rather than around the chain). Fasten off and weave in your ends. Then scroll down to the step labeled Sewing on the Button below! 


Sewing on the Button:

On the opposite end of the cozy from the loop, place your button so the side of the button is about an eighth of an inch from the edge of the cozy, as pictured below:


That's it! Your mug cozy is finished and ready to go around your favorite mug! 


Abbreviation Key:

ch = chain
sc = single crochet
dc = double crochet
R = row


If you enjoyed this pattern or have any critiques, let me know in the comments below, and if you make a mug cozy, tag me on Instagram @yarnsandtalescrochet! I can't wait to see your creations!

Have a great weekend, and I'll see you in two weeks with another crochet pattern!

~Abbie


Friday, September 4, 2020

Coffee Cup Cozy (a FREE crochet pattern for beginners)


Have you ever thought about how wasteful the little cardboard cup holders you pick up from Starbucks are? With the shift of people becoming more environmentally conscious, you might have considered this. And if you haven’t thought about it before, you probably are now!

Plus, let’s face it. They’re ugly. (Sorry, Starbucks. I still love you.)

A while ago, I decided that I wanted a reusable, better-for-the-environment alternative that I could personalize, so I did what I almost always do when in this situation: I made one! After some trial-and-error, this was the result, and honestly, I couldn’t be happier with how it turned out.

This pattern is beginner-friendly and walks you through a couple fundamental crochet stitches, but it’s also for the seasoned crocheters who want to make this cute and reusable cup cozy! This cozy is perfect for protecting your hands if you’re a warm coffee person, but it’s a good way to mark your cold drink as well.

Note: If at any point in time you need a reminder about what the abbreviations mean, I provide a key for you at the end of the pattern.

If you make this cozy, leave a photo in the comments below and post a photo to Instagram and tag me, @yarnsandtalescrochet (follow me there for more pattern updates)! And feedback is always appreciated. It's my hope to continue making patterns to share with fellow yarn fanatics, and seeing as this is my first pattern I'm sharing with the world, I have a lot of room to grow. I look forward to seeing your creations! 


Materials:

  • Size 4 yarn in a color of your choice
  • H/5.00 MM Hook
  • Scissors
  • A yarn needle (I prefer using a metal needle, but plastic yarn needles work just as well)


Check the yarn weight (size) on the label. It will be in a box like this:

Check the hook size written on the wide, flat part of the hook:

Step 1: Starting the Chain

1.1: Make a slipknot, insert hook into the loop and pull the loop taut around the hook.
1.2: Hold the yarn between your first and middle fingers and pinch the yarn close to the hook with your thumb and ring finger.

I’ve found that this finger placement gives me more control over the yarn and makes the stitches tighter together than a more traditional way to hold the yarn. 

You want to keep some tension in the yarn you’re holding between your fingers, but be careful. Too much tension will make your stitches too tight while too little tension will make them too loose. I encourage you to experiment with your tension to find what feels the most comfortable and natural for you!


Step 2: Chaining 

2.1: This pattern begins with a chain stitch (abbreviated as ch). To make a chain stitch, wrap the hook around the yarn (2A) (called yarning over) and pull the hook and yarn through the first loop (2B).

2.2: Repeat the chain stitch until you have 32 ch stitches, which form a V shape. Count the stitches like so:


Step 3: Slip Stitch to Join the Circle

3.1: Slip stitch (abbreviated as sl) to join the ends of the chain link to form a loop.
To slip stitch join, push the hook through the top of the very first loop of the chain (where the pink arrow is pointing in the photo to the right and indicated in 3a), wrap the hook around the yarn (3b), and pull the yarn loop through (3c & 3d).

3.2: ch 1 to close off the first row (abbreviated as R) and begin the second.


You have now finished the base of the cozy!

For the following rows, you will use a single crochet stitch (abbreviated as sc) and increase (abbreviated as inc) when instructed to steadily widen the top of the cozy.
I’ve found it easiest to single crochet if you hold the chain loop between your thumb and ring finger, but I would encourage you to play around with how you hold it and choose what feels the most natural to you.


Step 4: Learning the Single Crochet Stitch

4.1: To make the single crochet stitch, you will push the hook through the topmost loop of the chain loop (called the front loop) (4a), yarn over (4b), and pull the yarn through the chain loop (4c), but not through the loop that is already on your hook.

You will now have two loops on your hook (4d). Yarn over again (4e), and now you will pull through both loops on the hook (4f). This forms a single crochet stitch!

Note: When you sc over another sc row, you will push the hook through the top two loops (the V shape) of the sc stitch.
Feel free to practice the sc stitch as many times as you need, and I encourage you to play around with the tension in the yarn you’re holding to determine how tightly or loosely you want your sc stitches to be.

4.2: sc 32 times until you reach the end of the row.


When viewed from above, the sc stitch resembles a V shape, and to count the stitches, you will count each V shape as seen in the photo below:
4.3: Then you will sl join to connect the end of R2 to the beginning of R2, and ch 1 to begin R3. When you sl in a sc row, slip the hook through both top loops of the sc stitch.

Step 5: Increasing in Single Crochet

To increase (inc) a sc stitch, you will sc twice in the same stitch.


Step 6: Counting Rows

If you’re anything like me and tend to get easily sidetracked, it’s helpful to know how to count rows so you don’t lose your place and have to start over. For larger crochet projects, it might be beneficial to purchase a stitch marker (most craft stores carry them), but for something this small, you can manually count each row.
6.1: Lay your project flat. You’ll notice ridges along the sides, which are your single crochet stitches that form the rows as pointed out in the photo to the right.

Step 7: Continuing the Pattern

Now that you know the basics, the rest of the pattern goes like so:
R3-4: sc 32, sl join to close the row, ch1.
R5: sc 15, inc 2 sc in the same stitch, sc 15, inc 2 sc in the last stitch, sl join to close the row, ch 1. (You should have 34 stitches.)
R6-8: sc 34, sl join to close the row, ch 1.

R9: inc 2 sc in the first stitch, sc 16, inc 2 sc in the same stitch, sc 16, sl join to close the row, ch 1. (You should have 36 stitches.)

R10-11: sc 36, sl join to close the row, ch 1.

R12: sc 9, inc 2 sc in the same stitch, sc 17, inc 2 sc in the same stitch, sc 8, sl join to close the row, ch 1. (You should have 38 stitches.)

R13-14: sc 38, ch 1


Step 8: Fastening Off

When you finish the final row, sl join as usual, and ch 1. Then cut the yarn, leaving enough of a tail so that your cozy doesn’t become unraveled, and pull the tail through the final ch stitch. This is called fastening off.


Step 9: Weaving in the Tail

With your yarn needle, weave in the tail by pulling it down through a few rows to hide the tail, and then trim off the excess length.


Congratulations! You now have a cute and reusable coffee cup cozy!


I don’t include this in the photo of the finished cozy, but I wanted to add that you can further personalize your coffee cup cozy by adding buttons, iron-on appliques, or, if you’re more advanced in crochet, alternating between colors to make a striped or color block cozy are fun options as well! 

Abbreviation Key:

ch = chain
sc = single crochet
sl = slip stitch
inc = increase
R = row